MPage Project Setup
Starting a new MPage project is extremely simple thanks to our freely available GitHub project templates. Details on each template are provided in the table below.
| Description | clinicaloffice/mpage-template | clinicaloffice/mpage-component-template | clinicaloffice/ie-mpage |
|---|---|---|---|
| GitHub Location | https://github.com/clinicaloffice/mpage-template | https://github.com/clinicaloffice/mpage-component-template | https://github.com/clinicaloffice/ie-mpage |
| Template Purpose | Full page MS-Edge MPages for PowerChart or Mobile use through Discern Web Services | MS-Edge WebView2 compatible components for use in Cerner Workflow Component MPages | Legacy Internet Explorer compatible MPages/IE Cerner Workflow Component MPages |
| Browser Support | Microsoft Edge | Microsoft Edge | Internet Explorer 11/Microsoft Edge |
| Angular Versions | Version 16+ | Version 16+ | Version 12 Only |
Step-By-Step Guide
-
Decide on the template you wish to use. For all of your full-page MPages, you will want to use clinicaloffice/mpage-template which offers compatibility with the newest version of Angular in a Microsoft Edge environment.
If you are building components you wish to add to the Cerner component framework you will need to choose the template based on the browser your MPage is going to run in. For Microsoft Edge (WebView2) components, choose clinicaloffice/mpage-component-template. For components running in legacy Internet Explorer you will need to use clinicaloffice/ie-mpage.
* The template you choose includes settings and packages designed to work in the specified environment. Your MPage development however will be roughly the same code between templates and can easily be copied into a different template if you decide to change your supported platform in the future. -
Navigate to the GitHub project location described in the table above and click the "Use this template"
button.

-
You should now be on a screen titled "Create a new repository from mpage-template" (or one of the other
template names). From here
complete the prompts giving your MPage an Owner, Repository name, optional description and privacy level.
If you are working in a team of developers, it is highly recommended that you create an organization in
GitHub to use for your team and then use this organization as the Owner of your MPage projects. This will
allow for simplified sharing of your MPage among your developer team.
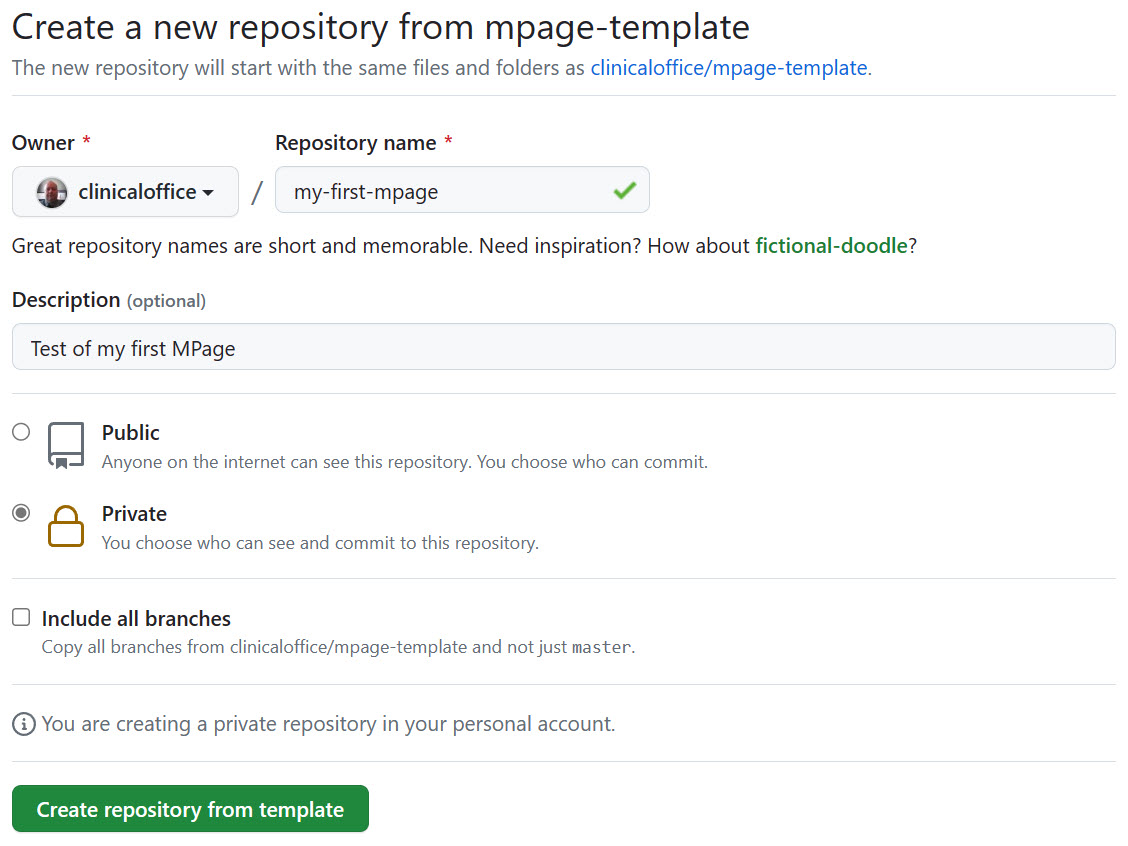
- Click the "Create repository from template" button when you have completed the steps above. After a few moments your repository will be generated with a copy of the template. It's a good idea to view the README.md file in your project to see what libraries are pre-installed and for instructions on how to setup your proxy.
-
Your template view in GitHub has a button called "Code". Click this button to view your Clone options.
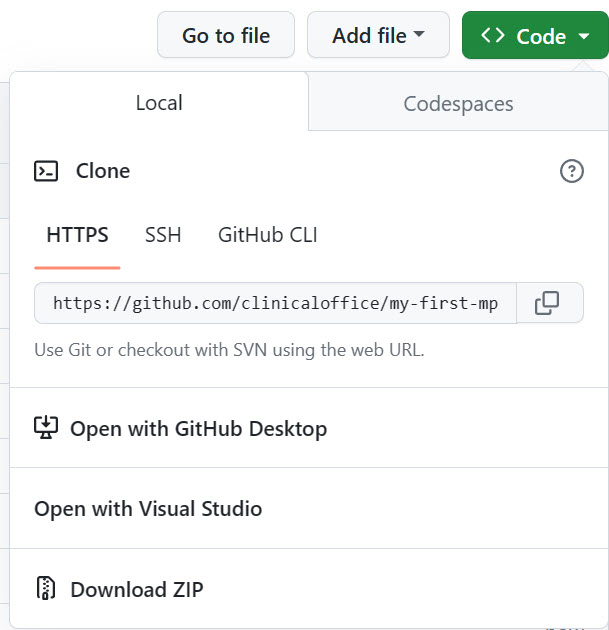
- The first Clone option shows the command line clone. Click the copy button next to the URL of your project to put your project location in your system clipboard.
- Open a command prompt on your development machine and navigate to a folder where you want to store your local copy of the source code.
-
Type in "git clone " followed by pasting the URL from memory.
git clone https://github.com/clinicaloffice/my-first-mpage.git
You should see the project be cloned to your development machine.
-
At this point, the project is now on your development machine however none of the required libraries are
installed. Navigate to your project folder and load the libraries using the npm install command. The npm
update command will fail if you do not have a valid Clinical Office:MPage license token defined in your
.npmrc file.
*Remember to replace my-first-mpage with the name of your project.
cd my-first-mpage
npm install
- Open your project folder in Visual Studio Code. This can be done by launching Visual Studio Code and choosing "Open Folder" from the "File" menu.
-
Once the folder has been opened, navigate to the "Edit" menu and select "Replace in Files". From there
replace all instances of the original template name ("mpage-template", "mpage-component-template", or
"ie-mpage")
with the template name of your project (e.g. my-first-mpage).
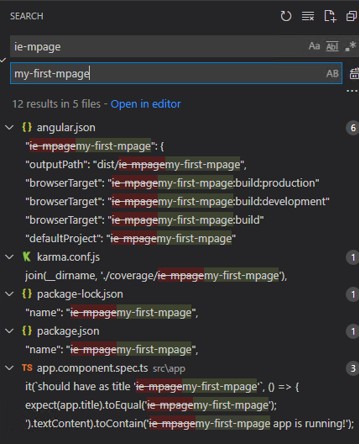
- Congratulations, you are ready to begin developing your MPage.
Next Steps
Your MPage is ready to start working on however there are a few additional steps you can take to improve your developer experience. If you are developing your MPage on the same network as the Discern MPages web service, you can quickly configure your project to use the built in Proxy in Angular to connect to the web service. This will give you the ability to have your MPage run while writing your code to see changes as they happen while at the same time having access to your Cerner data. Instructions for configuring the proxy are located below.
You will find that as you develop your MPages, they will tend to have a similar feel or use some of the same code base or SCSS styles. Using the instructions on this page you can create a copy of the ie-mpage or edge-mpage project as a base for your own organization template. Simply follow the steps above to create your project giving it a name that makes sense. We recommend with the same names (mpage-template, mpage-component-template and ie-mpage) as they will be unique to your organization name (your-org/mpage-template).
Locate the "Settings" tab for your project copy of the template on GitHub and in the "General" settings, make sure the box for "Template repository" has been checked. This will turn your project into a template that can be used for other MPage projects.
Once you have defined your own template project, you can use the instructions below to configure your proxy settings and save those settings to the template making them available for any new projects without configuration. You can also add your own libraries, changes the CSS styles and more. Once your changes are saved they will be available to any new project.
Proxy Configuration
The proxy built into Angular is a fantastic way to streamline your development. Without the proxy, testing your application involves compiling and deploying your code between each test.
The proxy is very simple to setup with the help of a CCL script designed to find the correct location of the Discern Web services.
The following steps assume you have installed all the Clinical Office:MPage Edition CCL scripts in your Cerner environment and that your site is remotely hosted. The 1co_show_service_dir script will not display a value on local Cerner installs.
For those clients who are locally hosted, you will need to consult your WebSphere administrator or Cerner representative to learn the location of your Discern MPages path. Once you have this information you can proceed to step 6 shown below.
- Open Discern Visual Developer and from the "Build" menu click "Run Prompt Program" (or press CTRL + /)
- Type 1co_show_service_dir:group1 into the "Program to run" field and click the "Run" button.
- You will be prompted for an output device. Just click the execute button to show the results on screen.
-
You should see the following output on your screen which includes some text, your contextRoot / cclproxy
value and a test iframe that attempts to connect to the Discern MPages server.
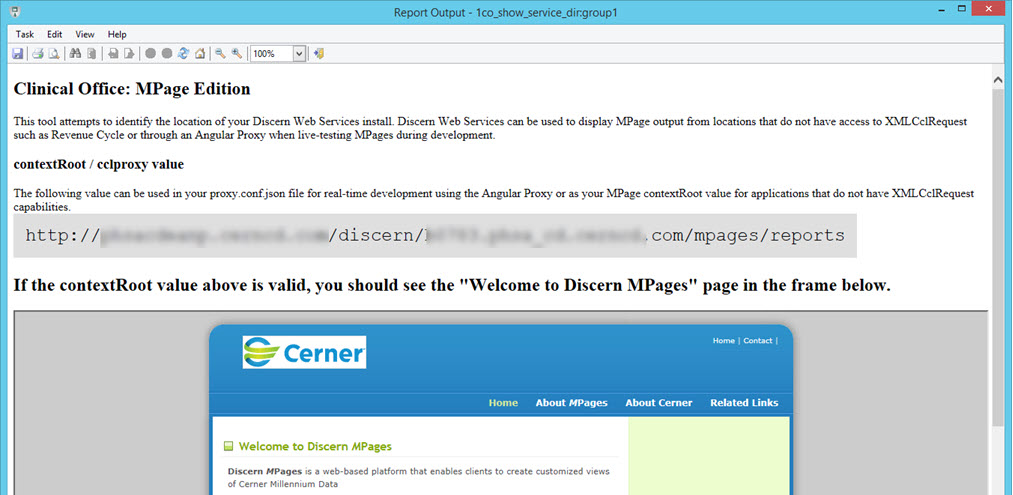
- Copy the URL returned from the CCL script into your clipboard or write it down.
-
In Visual Studio Code, open the proxy.conf.json file located in your src folder. This file should
have the following content:
{ "/cclproxy/*": { "target": "http://sub_domain.host_name.com", "secure": false, "changeOrigin": true, "logLevel": "debug", "pathRewrite": { "^/cclproxy": "" } } } -
Replace the "target" value with the value you copied from the CCL script and save the results.
"target": "value from the 1co_show_service_dir CCL script"
-
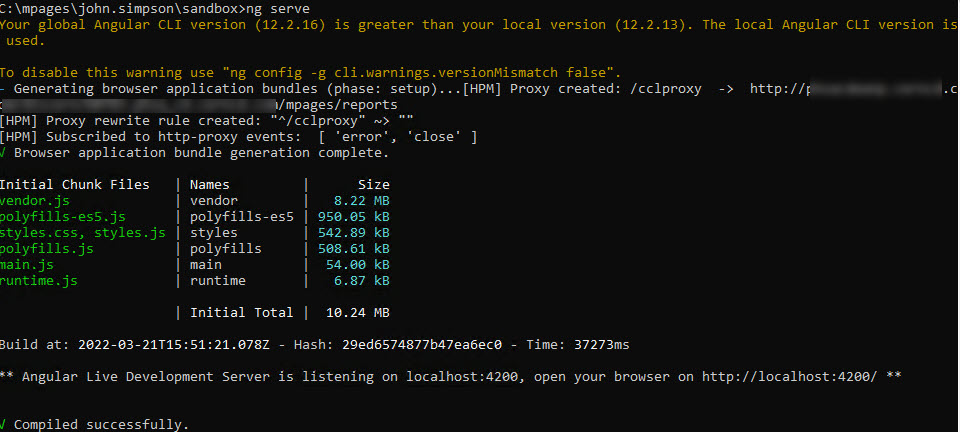
Your proxy should now be configured. From a command line, type in the following to start the real-time build of
your application. * This will take a few minutes the first time as all of your modules are compiled but
will be quicker on subsequent runs.
ng serve
-
Once the compile has completed you will see some messaging about the proxy as well as some compilation
information followed by a message "Compiled successfully". You may see warnings about the global Angular CLI
version. These warnings indicate that your development PC is running a different version of Angular from
the version the project is using. You can safely ignore this message or in the case of Microsoft Edge MPages
you can update your package.json file to match the new version (or perform an Angular update of the project).
Do not do this with Internet Explorer MPages or you may install a version of Angular not compatible with IE.
-
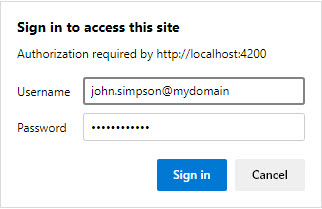
You can now view your MPage by opening a web browser and navigate to http://localhost:4200. If your proxy is
working you will see a login screen asking for your Cerner credentials. The username format is your Cerner
username, the @ symbol and the domain name you are connecting to.
- You will now see your empty MPage up and running. You can type in CTRL + / to open the built-in debugger which defaults to the Activity Log view. You should see some basic information such as browser agent and where your MPage content will be served from. An initial ping to CCL is also performed resulting in a Process ID 0 initiated with the payload of {"payload":{"patientSource":[{"personId":0,"encntrId":0}]}}. If you navigate to the "Instance 0" tab you should see your prsnlId populated in the chartId object.
- At this point, while the proxy is up and running, you can make changes to your source code, save those changes and immediately see the updated code take effect in your MPage. To exit the proxy/real-time development mode simply return to your command prompt and press CTRL + C to exit.
